




How To Build Garrisons, Outposts, and Tunnels in Hell Let Loose: Vietnam
A team that spawns two hundred metres from the objective holds it, and a team spawning a kilometre back loses it while still winning most of its gunfights. Every spawn structure in Hell Let Loose: Vietnam is built by a player, paid for in supplies that another player delivered, and destroyed by an enemy who found it. Understanding that chain explains most rounds better than any weapon statistic does.
How Spawn Structures Work in Hell Let Loose: Vietnam
Squad Leaders own this system, since they place Outposts for their own unit, build Garrisons that the whole team can use, and dig the tunnel network on the NVA side. Supplies pay for almost all of it, and supplies arrive either from a Specialist who drops them or from Commander abilities that send a truck, a boat, a helicopter, or an automatic airdrop. Each supply unit contains 150 supplies, vehicles carry two units at a time, and an empty vehicle refills at the repair station back at the HQ. The structures themselves also reveal nearby enemies on the map, which cuts both ways: your garrison warns your team about an approach, and theirs warns them about you. If none of this has come up in your matches yet, the Hell Let Loose: Vietnam Beginner's Guide - Tips and Tricks for Your First Matches covers the spawn screen habits that make the network readable.
All Spawn Structures in Hell Let Loose: Vietnam

Three structures cover the whole network, and they differ in who builds them, what they cost, and who gets to use them.
Structure | Built by | Cost | Who can spawn there |
|---|---|---|---|
Outpost | Squad Leader, using the notepad | No supplies | The Squad Leader's own squad, on a 20-second timer |
Garrison (friendly territory) | Squad Leader | 50 supplies | The entire team |
Garrison (enemy territory) | Squad Leader | 100 supplies | The entire team |
Tunnel (NVA only) | Squad Leader | No supplies | The entire team, with fast travel between connected tunnels |
Spawn beacon | Recon Spotter | No supplies | The Recon duo, in hostile sectors |
Note: the 20-second outpost timer means a squad wiped together comes back together, which is usually better than trickling in one at a time from a garrison further back.
Building and Defending the Network

The cheapest spawn in the game, and the one most Squad Leaders forget to update.
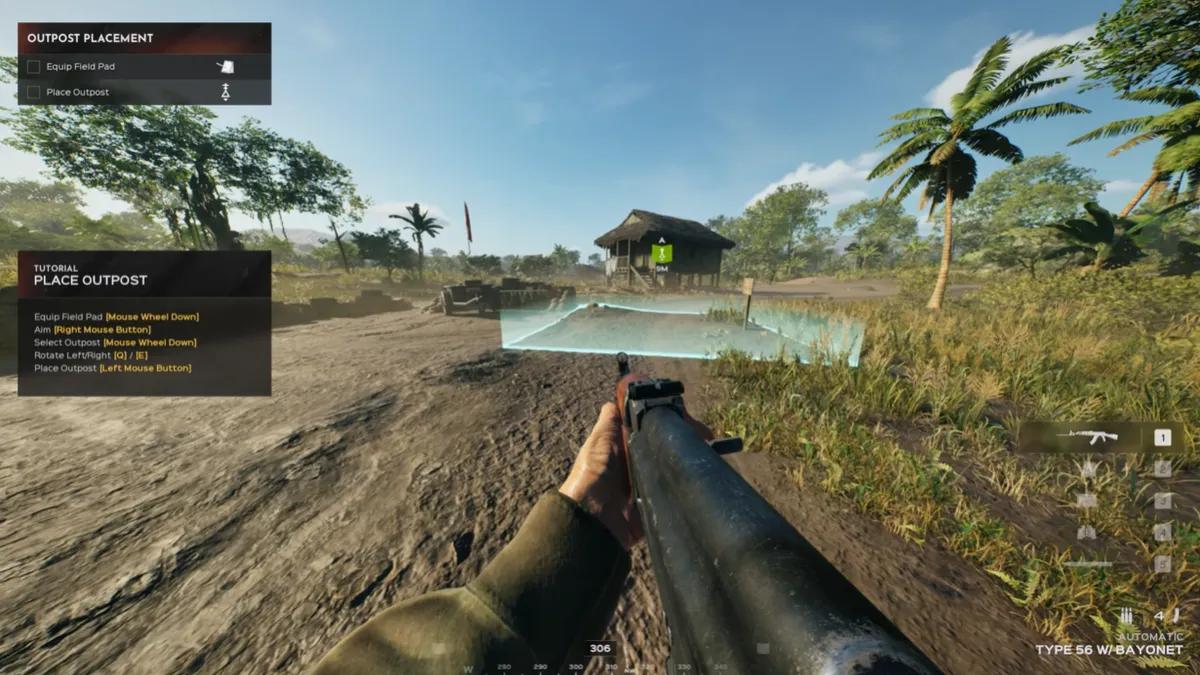
Placing an Outpost is a Squad Leader's first responsibility after joining a fight, because it turns a squad wipe from a two-minute walk into a twenty-second reset. The catch is that it needs to keep moving: an Outpost left at the position where the squad started is worthless once the push has advanced two hundred metres past it. Reposition it every time the squad commits to new ground, and place it behind cover rather than on the obvious approach, since it will be found if enemies walk past it. Outposts only serve your own six players, so they solve squad cohesion rather than team logistics. That second job belongs to garrisons.
Garrisons cost supplies and attract attention
Fifty supplies in your own territory, a hundred in the enemy's.
Garrisons let the entire team spawn, which makes them the structure that decides whether a sector gets contested seriously or defended by whoever happens to be nearby. The supply requirement doubles in enemy territory, so a forward garrison is an expensive investment that needs the Commander or a Specialist to deliver the boxes first. Anything placed near a contested sector will eventually be spotted, and the correct assumption is that it will die rather than that it might. Drop a second batch of supplies at a reserve position early, keep the location to yourself, and rebuild there the moment the first one goes down. A team that rebuilds within a minute barely notices the loss, while a team without a reserve spends the next five minutes walking.
NVA tunnels change the math
No supply cost, and a fast travel network on top.
Tunnels are the NVA's structural advantage, and they cost nothing to build, which makes them far easier to spam across the map than garrisons. Connected tunnels let troops move between spawn points quickly, so losing a forward garrison hurts the NVA much less than it hurts the US side. The value comes from placement rather than quantity, so think about where the enemy is least likely to expect infantry to appear and build a ring around the sector you are contesting or defending. Coming out of a tunnel on a flank the US team never checked is worth more than three tunnels behind your own line. For the US, that same network is the reason their side often has to hunt two systems at once instead of one.
Destroying the enemy network
Cutting spawns is the single biggest swing available to either team.
Garrisons and tunnels are stationary, which makes them ideal targets for a Precision Strike once someone marks the exact location, while a Bombing Run or Artillery Strike covers approximate positions well enough. Infantry can dismantle them by hand, but both structures mark nearby enemies on the map, so sneaking up on one is difficult and usually costs a life or two. The payoff is worth it, because a team pushed back onto distant spawns arrives at the objective in a trickle and gets cut apart in pieces. That is also why finding and killing the NVA tunnel network is a US priority rather than an optional side objective. Resource nodes deserve the same attention, since they sit near the enemy HQ, they cost supplies to replace, and a faction with dead nodes runs out of Munition for the strikes it needs to defend its own spawns. Strike costs, cooldowns, and the recon that precedes them are covered in How To Play Commander in Hell Let Loose: Vietnam.
Best Spawn Strategy in Hell Let Loose: Vietnam
The team that wins usually has a working garrison close to the fight, a reserve position stocked with supplies, and Squad Leaders who reposition Outposts as the line moves. Build the reserve before you need it, since the moment a garrison dies is the worst possible time to start arranging a supply run. Keep at least one spawn deliberately away from the obvious approach, because the enemy Commander is looking at the same terrain you are and will call a strike on the position that looks correct. How aggressive this network should be depends on the mode you are playing, and All Game Modes in Hell Let Loose: Vietnam Explained covers why Offensive rewards defensive placement while Conquest punishes losing spawns twice over.
Squad Leader construction tools and the Engineer's building equipment sit behind their own unlock levels, and How To Level Roles and Build Better Loadouts in Hell Let Loose: Vietnam explains which levels open which tools so you are not waiting on progression you have already earned elsewhere.


 Successfully copied... Thank you for sharing our content!:



5% deposit bonus up to 100 gems

a free Gift Case





EGAMERSW - get 11% Deposit Bonus + Bonus Wheel free spin


EXTRA 10% DEPOSIT BONUS + free 2 spins

3 Free Cases + 100% up to 100 Coins on First Deposit


5 Free Cases, Daily FREE & Welcome Bonuses up to 35%

3 free cases and a 5% bonus added to all cash deposits.

+5% to deposit




Comments