



All Mutants in STALKER 2: Full List, Weaknesses and How to Kill Them
 GSC Game World
Nineteen mutants roam the Zone once you count the two that arrived with Cost of Hope, and none of them carry loot. That single detail changes how you should treat every encounter: a fight you win still costs you ammo, bandages, and armour durability, and pays nothing back. This guide lists all mutants in STALKER 2, what each one does to you, and the shortest route to killing it when running is not an option. Names follow the in-game database, so a few of them differ from what older guides call the same creature.
Every Mutant in STALKER 2

Nineteen entries, sorted by the group the game files put them in. Mutants take damage differently from humans, and the gun that shreds a Bandit patrol can waste a full magazine on a Chimera, which is why STALKER 2 Weapon Tier List: Every Gun Ranked, Including Update 2.0 and DLC ranks by damage and accuracy rather than by how a gun feels in a firefight.
Mutant | Type | Main threat | Where you meet it |
|---|---|---|---|
Flesh | Animal | Lunge knockdown | Opening hours, open fields |
Blind Dog | Animal | Pack pressure, bleed | Everywhere, from the first hour |
Rodent | Animal | Swarm, constant bleed | Sewers, basements |
Rat Swarm | Animal | Tick damage at your feet | Confined interiors |
Boar | Animal | Charge knockdown | Fields and farmland, usually in pairs |
Bloodsucker | Animal | Invisibility, heavy bleed | Dark interiors, mid game onward |
Bayun | Animal | Mimicry, forced blindness | Ruins and settlements |
Psy-Dog | Animal | Damaging illusions | Mid game, open areas |
Hornhead | Animal | Armour, charge, screech | Trapper's hunt, rare elsewhere |
Pseudogiant | Animal | Ground slam shockwave | Late game, underground and industrial |
Chimera | Animal | Huge health, jump attacks | Swamps first, then endgame zones |
Zombie | Humanoid | Gunfire, damage resistance | Wherever Controllers are |
Snork | Humanoid | Leap attacks in tight spaces | Tunnels, labs, basements |
Burer | Humanoid | Telekinesis, disarms you | Warehouses, indoor arenas |
Controller | Humanoid | Psi damage, hallucinations | High-radiation and story areas |
Poltergeist | Ghost | Thrown objects | Enclosed rooms |
Pyrogeist | Ghost | Fire, summoned flames | Enclosed rooms |
Amok | Humanoid (DLC) | Armoured, needs capacitors broken | Iron Forest, CNPP |
Shadow Chimera | Animal (DLC) | Chimera plus illusions | Cost of Hope late areas |
How Mutants Behave in the Zone

Almost every mutant deals physical damage, and a handful add bleed on top. That makes physical resistance the stat that decides whether a pack is a nuisance or a death, with bleed resistance behind it, and Best Armor and Artifacts in STALKER 2: Suits, Slots and Cost of Hope Additions breaks down which suits actually cover both without gutting your radiation protection.
Four behaviours cover most of what you will face:
- Hit and run. Fleshes, dogs, boars, and rodents rush in, land a hit, and back off before you can punish them. Strafing sideways makes the charge miss and hands you a free window.
- Big health pools. Chimeras and Pseudogiants skip the retreat entirely. They stay in your face because they can afford to.
- Ranged pressure without a gun. Burers and Poltergeists never touch you. They throw the room at you instead.
- Mind attacks. Controllers do no physical damage at all. They drain your psi bar until you start fighting things that are not there.
Mutants carry nothing you can sell or use, so treat combat as optional unless the thing is guarding something or standing between you and an objective. I have walked away from more Chimera fights than I have won, and my ammo count has never once regretted it.
Animal Mutants and How to Kill Them
Eleven of the nineteen are twisted animals, and they make up the bulk of what you fight in the first twenty hours. Most of them live in the open, near the same fields and roadsides where anomalies cluster, so read All Anomalies in STALKER 2: Types, Arch Anomalies and Where to Find Them before you start backpedalling away from a pack without watching your footing.
Flesh

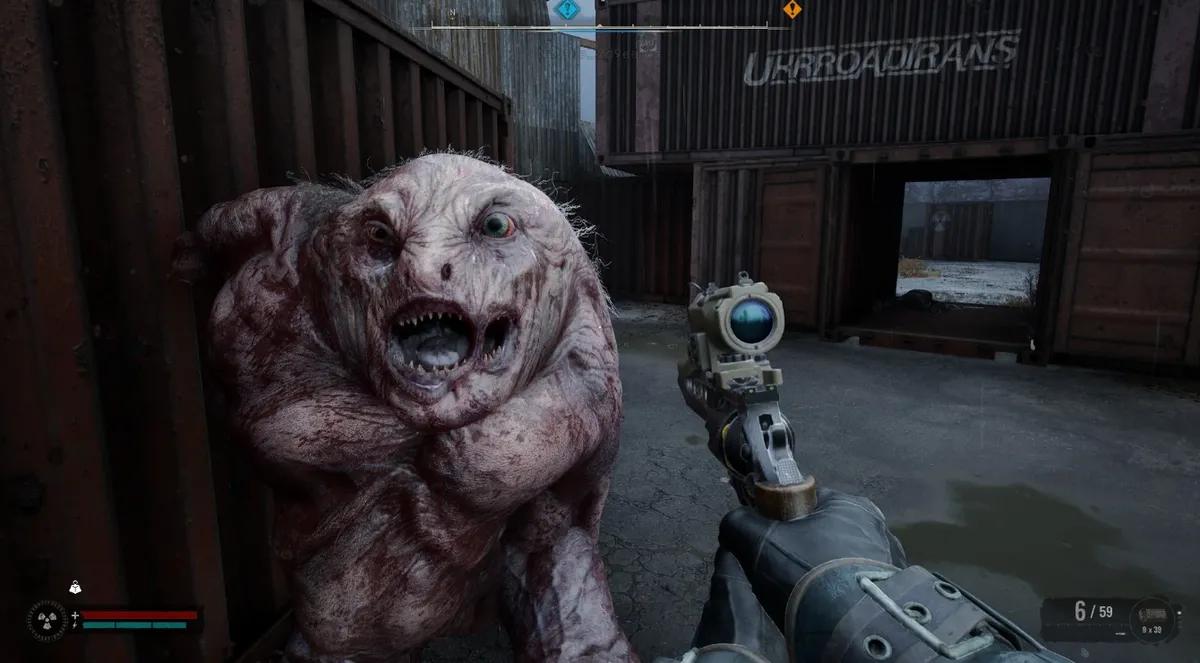
The first monster the Zone shows you. A Flesh is a four-legged mass that lunges forward to knock you over, and it has surprisingly little health for its size, only a little above a human.
Strafe sideways as it commits to the lunge and it lands on nothing. Fire while it turns around, then repeat. A shotgun ends it in one or two shots, but any weapon with a decent magazine works.
Blind Dog

Blind Dogs spawn in packs and use speed to get behind you. Individually they die fast and hit for little, though the bleed stacks up and a large pack surrounds you before you notice. They will not follow you onto surfaces they cannot reach, which turns any ladder or roof into a free position.
Do not fight them in the open. Back into a doorway, a corridor, or a shipping container so they can only reach you from one side, then pick them off. Be careful with ammo, since a pack can run to a dozen bodies.
Rodent

Mutated rats the size of a dog, walking upright, found in sewers and basements where regular dogs would make no sense. They behave the same way as dogs: low health, group spawns, constant bleed.
Their health is low enough that a shotgun is overkill. Use whatever is in your hands and save the shells.
Rat Swarm
The game treats a Rat Swarm as terrain rather than an enemy. It floods toward your feet and chews through your health while you stand there.
It cannot climb. Get onto a crate, a ladder, or a stairwell and the whole threat evaporates. From up there, one grenade clears the entire swarm.
Boar

Boars charge on foot instead of leaping, and a connecting charge puts you on the ground. They almost never appear alone.
The counter is identical to a Flesh: strafe out of the charge line, then punish the recovery. High-damage weapons pay off here because their health pool is thicker than it looks.
Bloodsucker

The Zone's most feared animal, and the reason experienced players stop entering dark rooms without a plan. A Bloodsucker turns invisible while hunting, closes at high speed, and only becomes visible in the instant before it strikes. Its attacks apply heavy bleed, and its roar slows and disorients you if you try to run.
Your flashlight makes it easier to spot, but it does no damage and does not force the creature out of stealth. Back into a corner so nothing can reach you from behind and shoot the moment it materialises. A shotgun is ideal, though average health means most weapons will do the job in a few magazines. Bandage the moment the fight ends.
Bayun

Small, cat-like, and the only mutant that lies to you. A Bayun mimics human and animal sounds to pull you toward it, then claws you once you are close. Its screech fills you with lethargy, slows your movement, and shuts your eyes for a moment in the middle of a fight.
It has more health than a dog but attacks the same way. Keep your back to a wall so it cannot circle you, wait until your vision clears, and hit it with a shotgun when you have a clean line.
Psy-Dog

The mutant most players name when asked which one they hate. A Psy-Dog looks like an ordinary dog until you shoot it, at which point it retreats and spawns copies of itself that also hurt you. Each copy dies in one hit, and the real animal keeps its distance and makes more whenever the illusions run out.
Telling the real one apart is close to impossible at ground level. Climb onto something the copies cannot reach and pick out the genuine dog with a scoped weapon. If there is nothing to climb, leave. This is almost never a fight worth finishing.
Hornhead

Older guides call this one the Armored Elk, and both names describe the same creature: a hooved mutant plated across most of its body, hard to damage in low light, with a charge that knocks you flat and a screech that disorients you. Its health pool is deep enough to swallow several magazines.
You meet it during the Trapper's hunt, surrounded by dogs, rats, and boars, which is what makes the encounter dangerous rather than the Hornhead itself. Put your back to the cliff wall, clear the small animals first, and stay near Trapper so his fire draws some of the pressure. The same mutant appears elsewhere in the Zone, rarely, and far weaker than the scripted one.
Pseudogiant

A Pseudogiant is a wall of muscle on two short legs. It charges, it leaps, and it stomps the ground to send a shockwave that knocks you over from any angle, which is the attack you cannot dodge with footwork alone.
Everything else can be avoided by strafing and keeping moving. Keep your health topped up, keep distance where the terrain allows it, and bring something with high damage, because you are not going to miss a target this size. Ammo is the real requirement.
Chimera

Four legs, two faces, and a health pool that punishes anyone who commits to the fight without counting bullets first. Its plan is simple, jumping at you over and over, and it works because each hit takes a large bite out of your health.
There is no clever counter. Strafing dodges some jumps, and the rest comes down to how much ammo you brought. Your first Chimera turns up in the swamps on the way to Clear Sky, and running past it toward the objective is the correct call. Fighting one in tall open grass is the worst version of the encounter, and that particular fight has a scripted Emission halfway through it.
Humanoid Mutants and How to Kill Them
Four mutants used to be people, and they fight like it. Two of them still carry the equipment they died in. Their territory overlaps heavily with the areas different groups claim, and All Factions in STALKER 2: Bases, Reputation and Who to Side With covers who else is likely to be shooting at you while a Controller works on your head.
Zombie

Zombies are stalkers the Zone finished off. They shuffle around, pay little attention, and are easy to sneak past. When they do notice you, they fire whatever weapon they died holding and make no attempt to take cover.
They soak an enormous amount of body damage and drop to headshots. They stand still enough to make that easy. The danger is numbers, so use cover and take them one at a time rather than wading in.
Snork

Snorks are mutated humans running on all fours, usually underground, closing the distance in seconds to swipe and kick. A group of them in a tunnel is genuinely frightening the first time.
Their health does not match their aggression. A shotgun drops one per shell. The name comes from the gas masks fused to their faces: the hanging tubes looked like snorkels to the local militia, and the word stuck.
Burer

Short, hunched, wrapped in a cloak, and more dangerous than it looks. A Burer never swings at you. It uses telekinesis to lift whatever is lying around and fire it at you, shoves you back if you get close, raises a barrier that eats your bullets, and rips the gun out of your hands if you approach with it drawn.
Fight from medium range with cover between you and the debris. Shoot until the barrier goes up, wait for it to drop, then shoot again. If it disarms you, pick the weapon off the ground and carry on, because the interruption costs you seconds rather than the fight.
Controller

The only mutant in the game that never touches you. A Controller blasts psi radiation whenever it has line of sight, shaking your camera and slowing you down, and low psi resistance means the attack starts generating hallucinated enemies that deal real damage. It usually travels with a group of zombies it has taken over.
Strip away its escort, then take a psi pill. That cuts its influence enough that you can walk after it and empty a magazine into its back. Without pills, rush it and do as much damage as you can before your resistance collapses. If a hallucination appears, kill it fast and get back on the real target.
Ghost Mutants: Poltergeist and Pyrogeist
Two entries in the roster have no body to shoot at, which makes them the most confusing enemies in the game for anyone meeting them for the first time.
Poltergeist

A Poltergeist is invisible and fights entirely through the environment, hurling furniture and rubble hard enough to take a serious chunk of health. It sounds like whispering wind and looks like a warbling circle in the air. Shoot at it and it flees, which turns the encounter into a chase around the room.
Apply constant pressure and follow it when it runs, dodging whatever it throws on the way. At low health it pulls rocks into a shield around itself, so wait that out rather than wasting ammo on the barrier.
Pyrogeist
The fire variant works the same way with one difference: it is a flying ball of flame that summons fire on the ground to damage you. Treat it as a Poltergeist that punishes standing still, and keep your feet moving between shots.
The Two Mutants Added in Cost of Hope
Cost of Hope brought two new creatures alongside its new regions, and both of them refuse to die by the usual methods. They live in the Iron Forest and around the power plant, which means you meet them in the middle of the expansion rather than at the end of it. Every Cost of Hope DLC Mission in STALKER 2 lays out which quests take you into their territory.
Amok

An Amok is a heavily armoured mutated human, and shooting it in the chest achieves nothing. Capacitors sit on its back, and until you destroy them the creature takes almost no damage.
That makes positioning the whole fight. Circle it, break the capacitors, and only then commit your ammo. Anyone who opens with a full magazine to the front will run dry before the fight properly starts.
Shadow Chimera
A stronger Chimera that borrows the Psy-Dog's trick and summons an illusion of itself. You get the original problem, a massive health pool and jump attacks that hit like a truck, plus a second target soaking your bullets.
Wait for the illusion to commit to an attack rather than trying to identify it at a distance, and keep the real Chimera in front of you at all times. It drops the Heart of a Shadow Chimera artifact, which is the reason to fight one at all.
Which Mutants to Fight and Which to Run From
Nothing in the Zone drops loot, so the decision is always about what the fight costs you.
Worth killing:
- Fleshes, Boars, Rodents, and Snorks, because they die fast and cost a handful of rounds.
- Zombies, when they block a corridor and headshots are available.
- Bloodsuckers, if you are cornered anyway, since running just gets you hit in the back.
- Shadow Chimeras, for the artifact.
Worth avoiding:
- Psy-Dogs, always. The illusions cost more ammo than the fight is worth.
- Chimeras outside a scripted encounter.
- Pseudogiants, unless one is parked on your objective.
- Rat Swarms, which you can simply climb away from.
Controllers sit in the middle. Leaving one alive means fighting its zombies forever, so clearing it usually pays for itself.
Best Weapons and Ammo Against Mutants

Shotguns do the heaviest lifting in this game because most mutants close the distance for you. The SPSA-14 and the Saiga D-12 handle dogs, Fleshes, Snorks, Bayuns, and Bloodsuckers without ceremony. Keep a full stock of buckshot when you know you are heading underground.
Armoured targets flip the requirement. Hornheads and Amoks shrug off pellets, so a rifle with armour-piercing rounds does more in one magazine than a shotgun does in three. The same applies to zombies, where you want accuracy for the headshot rather than spread.
For the big three, Chimera, Pseudogiant, and Shadow Chimera, bring the highest damage per shot you own and enough ammo to sustain it. Grenades are worth carrying for Rat Swarms and dense dog packs, and psi pills matter more than any weapon when a Controller is in the room.
One consumable habit will save you more than any gun choice: keep bandages on your quick slot. Bloodsuckers, dogs, and rodents all leave you bleeding, and I have lost more health walking away from a won fight than I ever lost during one. Your route out of the Zone matters too, since the endgame decides how much of this preparation was worth doing at all, and All STALKER 2 Endings: Four Base Routes and Both Cost of Hope Outcomes covers where each path takes you.


 Successfully copied... Thank you for sharing our content!:



5% deposit bonus up to 100 gems

a free Gift Case





EGAMERSW - get 11% Deposit Bonus + Bonus Wheel free spin


EXTRA 10% DEPOSIT BONUS + free 2 spins

3 Free Cases + 100% up to 100 Coins on First Deposit


5 Free Cases, Daily FREE & Welcome Bonuses up to 35%

3 free cases and a 5% bonus added to all cash deposits.

+5% to deposit




Comments